Using iMovie, I created a two minute video that shows a variety of my photographs that have been taken over the past couple of months. Throughout the video, I use transitions, titles, and the Ken Burns effect. The video uses background music from the artist Kate Voegele with the song "Manhattan From the Sky." The video is titled "Capture the Moment". I edited, produced, and directed the movie myself, exported it as a Quicktime file, and then uploaded the video onto YouTube and posted the video onto my blog. You can view the video below:
Thursday, April 30, 2009
Tuesday, April 28, 2009
Indesign Brochure
Photography opens a lot of doors. With a degree or experience in photography, enthusiasts can choose from a long list of careers in which their talents will come to use. Because of this, I created a double-side brochure that contains six different photography careers, with a small paragraph about each. This brochure was created in Adobe's Indesign program. It can be folded into thirds as a brochure and distributed. In addition to the explanation paragraphs, each type of photography has an example photo. After the project was completed, the brochure was exported as a PDF file. Click on the link below to view the PDF brochure that I created! Once on the Box.net sight, you download my brochure. After viewing, make sure to press the back button to return to my blog so you can explore the rest of my online portfolio!
http://www.box.net/shared/8p0m2i9g45
http://www.box.net/shared/8p0m2i9g45
Website
Focused on the topic of photography, I created a five page website using Adobe Dreamweaver. This website covers four different topics of photography. It provides pages dedicated to the history of photography, a gallery of famous photographs, careers in photography, and additional resources to explore. Several of the photographs on the site were taken by me, and the ones that were not, are followed by a citation. Once I had finished formatting the project in Dreamweaver, I uploaded it to the class web page using Filezilla. The website contains links to many of my other projects, including my Indesign brochure and this blog. Also, there are several hyper linked links that take the viewer to sites that will further advance their knowledge and curiosity about photography. Take a look at my website by clicking HERE or following the link below! After viewing all pages of the website, there is a link on the "Additional Resources" page that has a green highlighted link that will bring you back to my blog.
http://jmcnewmedia.com/jcollins/
http://jmcnewmedia.com/jcollins/
Photoshop
One of the first projects of the season was created using Adobe Photoshop. I took a personal photograph and then condensed it in size, and exported it for both Indesign and for the web. Then in addition, I used a filter to give the third photo a more creative and artistic look. The filter that I used was called "Smudge-Stick" and is represented in the bottom photo. The original photograph was taken in 2006 in Kenya, Africa, when I traveled there for a volunteer opportunity. The first photograph in this sequence is the one that was edited for Indesign, the second is for the web, and the third (as mentioned previously) was created using a filter and exported for the web.


Team Wiki
As a course requirement, three of my classmates and I created a Wikipedia page. This project is the only part of my portfolio that is not dedicated to photography. Instead, it discusses President Obama's administration. The page covers the many topics of the Presidential administration, from how people become appointed to the administration to the different members of the administration. It also discusses the plans the Obama has for different parts of our economy and country welfare. Each of the four members of this Wikipedia contributed equally to this project, by doing approximately four posts each. Each post contains a signature at the end that ties the post to a certain member. The following four posts were created by me:
http://barackobamaadministration.wikispaces.com/
After exploring the wikipedia page, you can either press the back button to continue viewing my blog or simply exit the internet. The Wikipedia page does not have a link to this blog and that is why I saved it for the last posting of my electronic portfolio.
- The Home Page
- What IS the Obama Administration?
- How Members Become Appointed to the Presidential Administration
- Barack Obama's Plans for Energy and the Environment
http://barackobamaadministration.wikispaces.com/
After exploring the wikipedia page, you can either press the back button to continue viewing my blog or simply exit the internet. The Wikipedia page does not have a link to this blog and that is why I saved it for the last posting of my electronic portfolio.
Monday, April 27, 2009
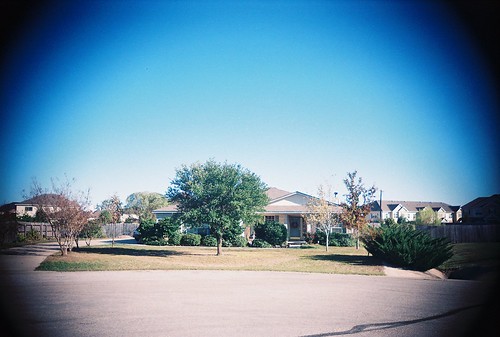
Vignetting
Vignetting is a technique in photography that is used primarily to add depth and creativity to a subject. It requires reducing the brightness and saturation on the outer edges of the photograph instead of in the center. The word vignette originally referred to a decorative border in a book.  Vignetting is usually unintended and often undesired, but is sometimes purposely introduced for a creative effect. A photographer can specifically choose a lens in which to produce vignetting. Special filters and post-processing procedures can also create this effect. In addition, in the area of digital photography, some photo editing programs have the availability of a vignetting tool that can be added after the photograph has been taken and imported.
 There are four types of vignetting: mechanical, optical, natural, and pixel. The first, mechanical vignetting, occurs when light beams from an object is partially blocked by external objects such as thick or stacked filters. The darkening can either be gradual or abrupt, depending on the aperture.
 Optical vignetting is cause by the physical dimensions of multiple element lens. Rear elements are shaded by elements in front of them which reduces the effective lens opening for off axis light. The result is a gradual decrease in the light intensity. This effect is sensitive to aperture.
 Natural Vignetting is unlike the two previous types. It is not due to the blocking of light rays. The falloff is approximated the angle at which the light hits the film or sensor. It is affected by the cosine of the angle of the light.
 The last kind of vignetting, Pixel, only affect digital cameras and is cause by the angle dependence of the digital sensors. Most digital cameras use built in image processing to compensate for optical this vignetting when converting raw sensor data to standard image formats, such as JPEG or TIFF.
Whether you mean to have vignetting in your photograph or it comes as a mistake, this technique can draw the viewer to the center of the photograph and can add interest to an otherwise dull photograph.
Vignetting is usually unintended and often undesired, but is sometimes purposely introduced for a creative effect. A photographer can specifically choose a lens in which to produce vignetting. Special filters and post-processing procedures can also create this effect. In addition, in the area of digital photography, some photo editing programs have the availability of a vignetting tool that can be added after the photograph has been taken and imported.There are four types of vignetting: mechanical, optical, natural, and pixel. The first, mechanical vignetting, occurs when light beams from an object is partially blocked by external objects such as thick or stacked filters. The darkening can either be gradual or abrupt, depending on the aperture.Optical vignetting is cause by the physical dimensions of multiple element lens. Rear elements are shaded by elements in front of them which reduces the effective lens opening for off axis light. The result is a gradual decrease in the light intensity. This effect is sensitive to aperture.Natural Vignetting is unlike the two previous types. It is not due to the blocking of light rays. The falloff is approximated the angle at which the light hits the film or sensor. It is affected by the cosine of the angle of the light.The last kind of vignetting, Pixel, only affect digital cameras and is cause by the angle dependence of the digital sensors. Most digital cameras use built in image processing to compensate for optical this vignetting when converting raw sensor data to standard image formats, such as JPEG or TIFF.Whether you mean to have vignetting in your photograph or it comes as a mistake, this technique can draw the viewer to the center of the photograph and can add interest to an otherwise dull photograph.
Sunday, April 19, 2009
Photographic Printing
 Photographic printing is the process of producing a final image for viewing on paper, using chemically sensitized paper. The paper is exposed to either a negative, a transparency or slide, or a digital image file.
 Photographs can be printed on color or black and white paper. Printing on black and white paper consists of four major steps, performed in a dark room or with a printing machine:
1. The image is exposed onto the paper using a contact printer or enlarger.
2. Processing of the latent image using the following chemical process:
-
- Development of the exposed image reduces the silver halide in the latent image to metallic silver;
- Stopping development by neutralising, diluting or removing the developing chemicals;
- Fixing the image by dissolving undeveloped silver halide from the light-sensitive emulsion:
- Washing thoroughly to remove processing chemicals protects the finished print from fading and deterioration
- 3. After fixing, the photograph is cleansed using a hypo clearing agent to remove any fixer that could damage the print.
- 4. Prints are then chemically toned or hand colored after processing.Printing on colored paper requires the use of processing with certain propriety chemicals. The two main processes are RA-4, which is used for printing color negatives, and lifochrome, which is for printing color transparencies.
 RA-4 prints are color negatives printed on RA-4 paper and produce a type-c print. They consist of three emulsion layers, each sensitive to red, green, and blue light. During processing, couplers produce cyan, magenta, and yellow dyes, to represent the true colors of the subject. The combination of all of these colors is what give a photograph its final look.
 Lifochrome prints use a specialized Lifochrome paper that use the dye destruction process to produce prints from positive transparencies. The color dyes are induced onto the paper and are bleached during processing.
 Aside from printing an image in a dark room using chemicals, photographers can also print photographers from a digital computer file. The artist can view his or her photographs on the computer and edit them before they decide whether or not to print them. They can then be printed using Ink jet printers or specialized photo printers. Image files can also be taken in to labs so that professionals can develop your images for you.
Monday, April 6, 2009
Uno, Dos, Tres: Rule of Thirds In Photography
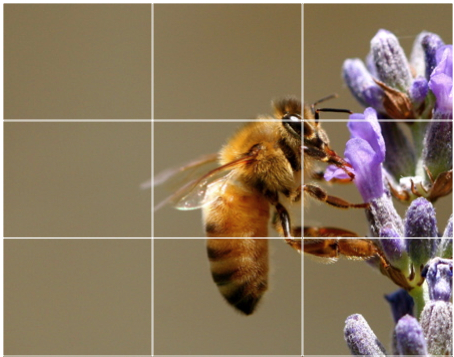
The rule of thirds is one of the main compositional rules in visual arts, including painting, design, and (of course) photography. This rule is based around the idea that an image should be imagined as being divided into nine equal parts by two equally spaced horizontal lines and two similar vertical lines, as shown in the photograph below. The rule continues on to state the important elements within the photograph, on these lines in order to obtain a successful photograph. Photographers claim that the reason use this technique is because it creates tension, energy and interest in the composition, more so then a photograph where the subject is dead center. For example, in the photograph below, the main subject is centered on one of the vertical lines, with the subjects eyes centered on one of the horizontal lines.
 However, points of interest in a photograph do not necessarily have to lie on these lines to take advantage of the rule of thirds. If a point of interest lies on the intersection between two lines, this also is considered to be using the rule of thirds. This intersection of two lines is often called a power point, and it is common to see a photograph place a subject of aspect of what they are photographing at this point.
 As mentioned earlier, the rule of third is not a technique used solely in photography. In any art form that has a main subject or point of interest, the rule of thirds is often used. In addition to photography, film uses this compositional rule as well. If filming a moving subject, the same pattern is followed with the majority of the empty space in front of the subject or in the direction that they are moving towards.
 The rule of thirds was first used as early as 1797 as a rule for creating correct proportion in scenic paintings. In J T Smith's illustrated book, published in 1797, the rule of thirds is clearly defined. "...the rule of thirds according to which a landscape having one third of land should have two thirds of water, and these together, forming about one third of the picture..."
 Any person who is avidly involved in art or photography would agree that using the rule of thirds is a good idea to make your photograph much more interesting and professional. Often, digital cameras will have a setting that allows the photographer to permanently have a set of lines following the rule of thirds in their viewfinder. However, it is also easy to do manually by eye and guessing. Like with most forms of art, this rule does not need to be perfect.
Photographers claim that the reason use this technique is because it creates tension, energy and interest in the composition, more so then a photograph where the subject is dead center. For example, in the photograph below, the main subject is centered on one of the vertical lines, with the subjects eyes centered on one of the horizontal lines.However, points of interest in a photograph do not necessarily have to lie on these lines to take advantage of the rule of thirds. If a point of interest lies on the intersection between two lines, this also is considered to be using the rule of thirds. This intersection of two lines is often called a power point, and it is common to see a photograph place a subject of aspect of what they are photographing at this point.As mentioned earlier, the rule of third is not a technique used solely in photography. In any art form that has a main subject or point of interest, the rule of thirds is often used. In addition to photography, film uses this compositional rule as well. If filming a moving subject, the same pattern is followed with the majority of the empty space in front of the subject or in the direction that they are moving towards.The rule of thirds was first used as early as 1797 as a rule for creating correct proportion in scenic paintings. In J T Smith's illustrated book, published in 1797, the rule of thirds is clearly defined. "...the rule of thirds according to which a landscape having one third of land should have two thirds of water, and these together, forming about one third of the picture..."Any person who is avidly involved in art or photography would agree that using the rule of thirds is a good idea to make your photograph much more interesting and professional. Often, digital cameras will have a setting that allows the photographer to permanently have a set of lines following the rule of thirds in their viewfinder. However, it is also easy to do manually by eye and guessing. Like with most forms of art, this rule does not need to be perfect.
Sunday, April 5, 2009
Panning Has Nothing To Do With A Pan
This week, I am talking about panning. Panning is a technique that many photographers use to make their photographs more visually pleasing and interesting. Panning is used to catch a object that is in motion and get a photograph of that movement.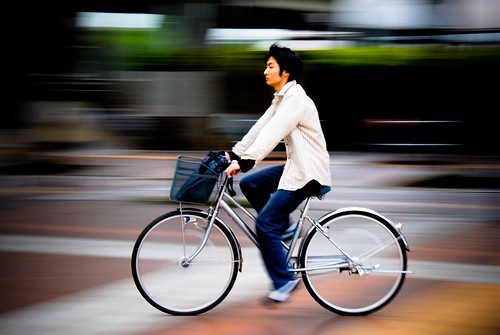 To create panning in an image, a photographer will scan the subject as they move. The photographer will focus on the subject and then as they begin or continue to move, will hold down the shutter and move the camera along horizontally or vertically with them. The result of doing this is the creation of all of the pictures that you see above and below: the subject is mostly or somewhat in focus and the background and surroundings are blurred.
 Panning is often used in film to follow a subject as the move of display the surroundings in a certain scene. It can also be used on a person that is standing still. If you subject is standing still in the midst of many moving objects, you can capture them, surrounded by a variety of motion blurs from the objects around them. This causes the photograph to focus in on the still subject and give a photograph an artistic edge.
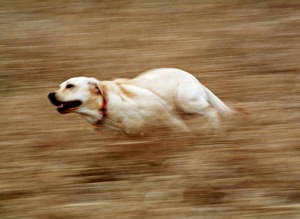 To obtain a clear picture during panning, the photographer must keep the subject in the same place in the frame for the duration of the pictures exposure. The exposure time must be long enough to allow the background to blur as you move the camera. If your exposure time is too short or quick, the background will also be in focus like the subject. Similarly, if the exposure time is too long, then both the subject and the background can become blurred if you stop or continue to move the camera. Exposure time is dependant on the shutter speed and aperture settings of your camera. On manual cameras and on some automatic cameras, this can be easily fixed by altering one or the other to get a longer exposure time. To help photographers get a more clear, steady panned photograph, they often use a tripod, to reduce camera shake and other interruptions.
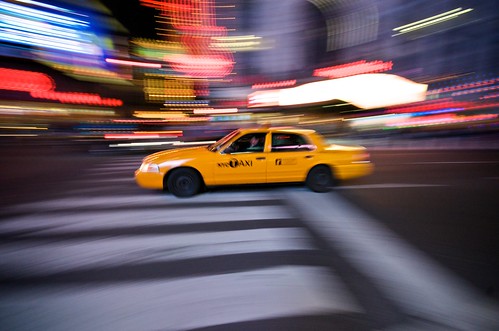 People may ask, "Why would you want a picture to be blurry?". However, when you look at a picture where one thing is clear and the rest is blurry, it gives the photograph a sense of complexity and artistic flare that may not be present in a regular photograph. It gives photographers the availability to capture something in motion and freeze it, making it more interesting and enjoyable to viewers.
To create panning in an image, a photographer will scan the subject as they move. The photographer will focus on the subject and then as they begin or continue to move, will hold down the shutter and move the camera along horizontally or vertically with them. The result of doing this is the creation of all of the pictures that you see above and below: the subject is mostly or somewhat in focus and the background and surroundings are blurred.Panning is often used in film to follow a subject as the move of display the surroundings in a certain scene. It can also be used on a person that is standing still. If you subject is standing still in the midst of many moving objects, you can capture them, surrounded by a variety of motion blurs from the objects around them. This causes the photograph to focus in on the still subject and give a photograph an artistic edge.To obtain a clear picture during panning, the photographer must keep the subject in the same place in the frame for the duration of the pictures exposure. The exposure time must be long enough to allow the background to blur as you move the camera. If your exposure time is too short or quick, the background will also be in focus like the subject. Similarly, if the exposure time is too long, then both the subject and the background can become blurred if you stop or continue to move the camera. Exposure time is dependant on the shutter speed and aperture settings of your camera. On manual cameras and on some automatic cameras, this can be easily fixed by altering one or the other to get a longer exposure time. To help photographers get a more clear, steady panned photograph, they often use a tripod, to reduce camera shake and other interruptions.People may ask, "Why would you want a picture to be blurry?". However, when you look at a picture where one thing is clear and the rest is blurry, it gives the photograph a sense of complexity and artistic flare that may not be present in a regular photograph. It gives photographers the availability to capture something in motion and freeze it, making it more interesting and enjoyable to viewers.
Wednesday, April 1, 2009
Top Six Reaons To Convert to Digital Photography
Over the course of photography's history, the medium with which photographers capture their subjects has varied. From long exposure film to high tech digital cameras, advances in technology and innovation have opened multiple doors for photographs to choose what kind of camera they want to use. Most photographers own several cameras, often including at least one film based camera. However, with the further development of digital cameras, there is many reasons to take photographs using a digital camera. Here are the top six reasons you as a photographer should use a digital camera:
Reason #1: It's easy and convenient. Digital cameras are user friendly, with easy to use features and gadgets. They are also more compact, not needed extra film, so they are more convenient for carrying around with you to ensure that you don't miss a photographic moment.

Reason #2: Digital cameras save time and space. With digital photography, you won't have those piles of used film sitting around waiting to be developed. In addition, you don't need a light room. Your light room for digital photography is your home computer! Also, digital cameras store the pictures on a memory system, making them available to review immediately after taking and deleting if they don't meet your expectations.

Reason #3: Digital photographs are easy to edit and alter. You simply plug the camera into your computer, open some photograph editing program, and your good to go. You can edit them on your own time and can easily fix and alter things in the photograph that may take away from your complete satisfaction. While you can still do this with film, it is harder and more time consuming.

Reason #4: Digital photographs are versatile. These kinds of photos can be printed anywhere, anytime, on just about any surface. They can be blown up without losing any of their quality and can be transferred to something as big as a billboard.

Reason #5: It's cheaper! With film photography, you have to buy expensive film and supplies or pay the fee to have your photos developed for you. The cost of cleaning, repairs, development, and film can get ahead of you before you know it, mounting up to more than your paid for camera originally. Digital cameras only require a memory card and inexpensive photo paper.

Reason #6: Digital photographs are easily transferred. You can share your digital photographs with family, friends, or distant relatives. Since most of your digital photographs, if not all, are stored on your computer, all you need to do is either upload the files to an email and send or copy them to a CD or other writable storage device. Film photography is harder to share and more time consuming.

Making the transition from film to digital is something that some photographers were reluctant to do. Its hard to alter the medium you use cause it can change your style and artistic creativity. However, in this growing technological age, the change to digital is welcomed and is worth the hard work and the risk.
Reason #1: It's easy and convenient. Digital cameras are user friendly, with easy to use features and gadgets. They are also more compact, not needed extra film, so they are more convenient for carrying around with you to ensure that you don't miss a photographic moment.
Reason #2: Digital cameras save time and space. With digital photography, you won't have those piles of used film sitting around waiting to be developed. In addition, you don't need a light room. Your light room for digital photography is your home computer! Also, digital cameras store the pictures on a memory system, making them available to review immediately after taking and deleting if they don't meet your expectations.
Reason #3: Digital photographs are easy to edit and alter. You simply plug the camera into your computer, open some photograph editing program, and your good to go. You can edit them on your own time and can easily fix and alter things in the photograph that may take away from your complete satisfaction. While you can still do this with film, it is harder and more time consuming.
Reason #4: Digital photographs are versatile. These kinds of photos can be printed anywhere, anytime, on just about any surface. They can be blown up without losing any of their quality and can be transferred to something as big as a billboard.
Reason #5: It's cheaper! With film photography, you have to buy expensive film and supplies or pay the fee to have your photos developed for you. The cost of cleaning, repairs, development, and film can get ahead of you before you know it, mounting up to more than your paid for camera originally. Digital cameras only require a memory card and inexpensive photo paper.
Reason #6: Digital photographs are easily transferred. You can share your digital photographs with family, friends, or distant relatives. Since most of your digital photographs, if not all, are stored on your computer, all you need to do is either upload the files to an email and send or copy them to a CD or other writable storage device. Film photography is harder to share and more time consuming.
Making the transition from film to digital is something that some photographers were reluctant to do. Its hard to alter the medium you use cause it can change your style and artistic creativity. However, in this growing technological age, the change to digital is welcomed and is worth the hard work and the risk.
Subscribe to:
Posts (Atom)
